Orchids are the largest family of flowering plants on Earth, with more than 25,000 species. Most indoor growers never see one bloom a second time. That gap, between what orchids are capable of and what most people get out of them, exists because of a handful of consistently repeated mistakes rather than any genuine difficulty with the plant. Mastering orchid care is not about having a green thumb or a perfect growing environment. It’s about understanding a few specific things this plant needs that are different from every other houseplant you’ve probably grown. Once you get those things right, the same plant will flower for you again and again, on the same stem or on a new one, season after season.
Before anything else though, ask yourself this: Are you buying an orchid for a one-time pop of color, or are you genuinely interested in keeping it alive and reblooming? There’s no wrong answer. But if you want the second option, this guide gives you exactly what you need.
| Aspect | Details |
|---|---|
| Botanical Name | Phalaenopsis spp. (Moth Orchid) |
| Other Popular Indoor Types | Dendrobium, Oncidium, Cattleya |
| Plant Family | Orchidaceae |
| Native Region | Southeast Asia, tropical Australia, Pacific Islands |
| Light | Bright indirect light, 10-12 hours daily, no direct sun |
| Water | Every 7-10 days in summer, every 10-14 days in winter |
| Humidity | 50-70% |
| Temperature | 65-80 degrees F (18-27 degrees C) day, 55-65 degrees F (13-18 degrees C) night |
| Soil/Medium | Coarse orchid bark mix, not standard potting soil |
| Pot Type | Clear plastic nursery pot with drainage holes |
| Mature Spike Length | 12-30 inches (30-75 cm) depending on variety |
| Growth Rate | Slow to moderate |
| Toxicity | Non-toxic to cats, dogs, and humans (ASPCA) |
| Difficulty Level | Beginner to Intermediate |
| USDA Zones | 10-12 outdoors |
Mastering Orchid Care: Start With the Right Plant
Mastering orchid care is easiest when you start with the species most suited to indoor growing. The Phalaenopsis, commonly called the moth orchid, is the variety sold at virtually every Home Depot, Trader Joe’s, Costco, and grocery store in the US. It’s the best beginner orchid by a wide margin, and it’s also the species this guide focuses on.
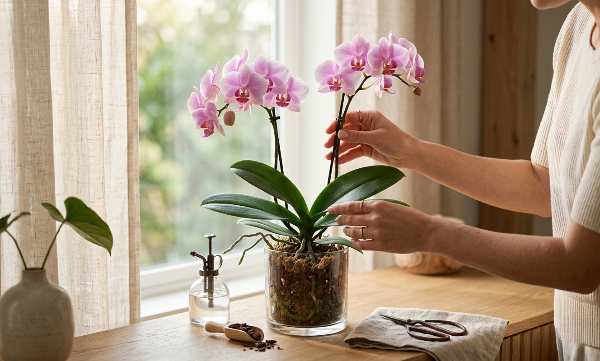
When choosing a plant, look for strong green roots visible through the clear nursery pot (we’ll talk more about roots in a moment), at least two to three healthy unopened buds on the spike, and no yellowing or spotted leaves. A plant with half its buds already open has less display time ahead of it than one that’s just starting. And skip anything with mushy leaves, shriveled pseudobulbs, or a potting medium that smells sour, that’s a sign of root rot.
One thing most buyers miss: check that the plant is in a clear plastic nursery pot inside any decorative ceramic or wicker sleeve. The nursery pot needs drainage holes. Without them, water collects at the base and root rot is almost guaranteed. Remove the decorative sleeve entirely or punch holes through it before watering the first time.
Read more: Tropical Indoor Plants Guide
Light: The Variable Most People Get Wrong
The standard advice of “bright indirect light” is correct but vague enough to be misapplied constantly. Here’s a more useful version: your orchid needs 10 to 12 hours of bright indirect light daily, and it should never receive direct midday or afternoon sun.
An east-facing window is ideal. The plant gets soft morning sun for a few hours, then gentle indirect light for the rest of the day. A north-facing window rarely provides enough light, and a south or west window requires a sheer curtain to filter the intensity between 10 AM and 4 PM.
What does insufficient light actually look like? The leaves turn a deep, dark green. Lush and green might seem healthy, but in orchid terms it means the plant is stretching for light and won’t have enough energy to produce a flower spike. Healthy Phalaenopsis leaves are medium green with a slight yellowish tint, sometimes described as grass green rather than forest green. That color tells you the plant is getting the light it needs for photosynthesis without the stress of excessive sun exposure.
Pro Tip: If you’re not sure whether your window provides enough light, place a white piece of paper in the spot at noon and hold your hand 12 inches (30 cm) above it. If you see a clear, defined shadow, the light is sufficient. A fuzzy or barely visible shadow means the spot is too dim for consistent flowering.
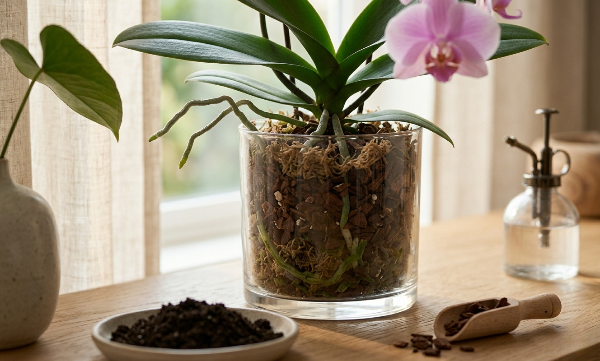
Mastering Orchid Care Means Understanding Roots
Nothing separates orchid care from standard houseplant care more clearly than the roots. Phalaenopsis are epiphytes in their natural habitat, meaning they grow attached to tree bark rather than in soil. Their thick, silver-green aerial roots are designed to absorb moisture from the air and anchor the plant to a surface. Putting those roots in standard potting mix, which holds water for days, is one of the fastest ways to kill an orchid.
Orchids need a coarse bark-based growing medium that mimics their natural environment. A pre-mixed orchid bark blend like Sun Bulb Better-Gro Orchid Bark or Miracle-Gro Orchid Potting Mix provides the right combination of drainage and moisture retention. Standard indoor potting mix should never be used.
The clear plastic nursery pot is not an accident or a cost-cutting measure by growers. It exists so you can see the roots and use their color to judge watering. This is the single most reliable watering method available for orchids, and mastering it is genuinely the most important skill in the whole process.
Here’s how it works: healthy, hydrated roots are bright green. Dry roots are silvery-white or grey. When you can see that the majority of roots visible through the pot have shifted from green back to silver, it’s time to water. If the roots are still mostly green, wait a few more days. No guessing, no schedule-following blindly, no finger test in bark that tells you almost nothing about moisture levels three inches down.
Watering the Right Way (And Forgetting the Ice Cube Myth)
The internet is full of advice suggesting you water your orchid with two or three ice cubes per week. This approach is convenient, and it’s wrong. Phalaenopsis are native to tropical Southeast Asia. Pouring ice-cold water onto the crown and roots of a tropical plant stresses the tissue and can cause the kind of cold shock that leads to crown rot, the condition where the plant’s central growth point turns mushy and black.
Watering a Phalaenopsis properly takes about 45 seconds. Bring the pot to a sink, run lukewarm water slowly through the bark for 30 to 45 seconds until it flows freely from the drainage holes, then let it drain completely before returning it to its saucer or sleeve. No standing water. No saucers left sitting full.
For timing, use the root color method described above rather than a rigid calendar. In summer with central air conditioning running and light levels higher, this typically means watering every 7 to 10 days. In winter with central heating running and lower light, every 10 to 14 days is more typical.
One important thing to watch out for: never let water sit in the crown of the plant, the central cup formed by the leaves. Water pooling there is the primary cause of crown rot. After watering, tilt the plant gently to pour out any water collected in that cup, or use a dry tissue to absorb it.
Read more: overwatering vs underwatering houseplants
Fertilizing: Less Than You Think
Orchids are light feeders. The standard recommendation is “weakly, weekly” during the growing season: a balanced liquid orchid fertilizer diluted to one quarter the recommended strength, applied every week or every other week in spring and summer.
I’ve had good results with Jack’s Classic Blossom Booster 10-30-20 during the months leading up to the flowering period. The higher phosphorus content supports flower development. During active growing months, a balanced 20-20-20 formula works well for general health. Espoma Orchid Plant Food is another reliable option. Whatever you use, the rule is the same: dilute more than the label says, and fertilize less often than you think you need to.
In fall and winter, fertilizing drops to once a month at most. Salt buildup from excess fertilizer is one of the more common causes of root tip burn in orchids, visible as brown, dried root ends. If you notice white mineral crust forming on the surface of the bark, flush the pot thoroughly with plain water for a full minute to clear accumulated salts.

Seasonal Orchid Care Calendar
| Season | Light | Watering | Fertilizing | Key Action |
|---|---|---|---|---|
| Spring | 10-12 hrs bright indirect | Every 7-10 days | Weekly, 1/4 strength balanced | Begin watching for new spike growth |
| Summer | 10-12 hrs bright indirect, filter harsh afternoon sun | Every 7-10 days | Weekly, 1/4 strength balanced | Move outdoors to shaded patio if temps stay above 65 degrees F (18 degrees C) at night |
| Fall | 10-12 hrs bright indirect | Every 10-14 days | Monthly | Begin 4-6 week temperature drop protocol to trigger spike formation |
| Winter | Maximize available light, supplement with grow light if needed | Every 10-14 days | Monthly or skip | Expect flower spike to appear; maintain cool nights to complete the process |
The Hardest Part of Mastering Orchid Care: Getting It to Rebloom
A Phalaenopsis will not produce a new flower spike unless it experiences a temperature differential between day and night for a sustained period, typically 4 to 6 weeks. During this period, daytime temperatures should remain around 70 to 75 degrees F (21 to 24 degrees C) while nighttime temperatures drop to between 55 and 65 degrees F (13 to 18 degrees C). A difference of at least 10 to 15 degrees F (5 to 8 degrees C) is the trigger.
This is why orchids placed near a slightly drafty window or moved to a cooler room in fall tend to rebloom reliably, while those kept in stable, heated interior rooms often produce beautiful foliage but no flowers.
What to do with the flower spike after blooms drop depends on the spike’s condition. If the spike is still green, cut it back to just above the second or third node counting up from the base. A new branch can develop from that node and produce another round of flowers faster than waiting for a completely new spike. If the spike has turned brown and dried, cut it all the way down to the base. The plant will eventually produce a new spike from the base when conditions are right, which brings mastering orchid care full circle back to the temperature differential technique.
Pro Tip: A windowsill in a room that isn’t actively heated overnight, like a spare bedroom or a sunroom, is often the ideal rebloom location in late September and October. Even a consistent 10-degree F (5 degrees C) nighttime drop is enough to initiate spike production within four to six weeks.
What I’ve Learned After Four Years Growing Phalaenopsis Orchids
The biggest shift in my understanding came when I stopped treating the orchid like a standard potted plant and started treating it like a mounted epiphyte stuck in a container. Once I switched to the root-color watering method, repotted into fresh coarse bark every two years, and started giving the plant a cool windowsill spot in fall, reblooming stopped being a mystery. The plant knows exactly what to do when conditions are right. Your job is just to provide those conditions and stay out of the way the rest of the time.
Read more: best grow lights for indoor plants
Repotting Orchids: When and How
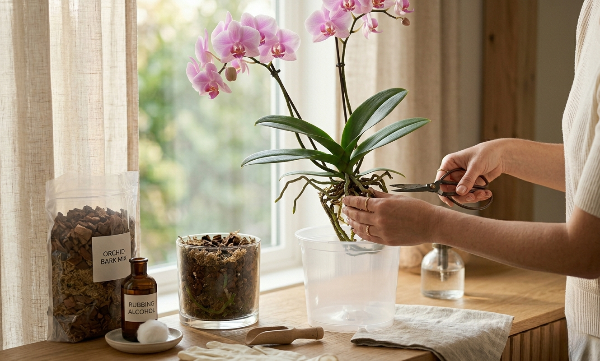
Repot every 18 to 24 months, or immediately if you notice the bark has broken down into fine particles, the roots are visibly rotting, or the plant has outgrown its pot. Spring, right after flowering is complete, is the best time.
Use a pot only one size up from the current one, typically a 4-inch (10 cm) or 6-inch (15 cm) clear plastic pot. Remove as much of the old bark as possible from the roots, trim any dead or rotting roots with clean scissors sterilized in rubbing alcohol, and let the cut root ends air dry for 30 minutes before repotting. Use fresh orchid bark mix and settle the plant so the base sits just at the medium surface, not buried.
Avoid These 5 Rookie Errors
- Using regular potting soil. Orchid roots need airflow around them. Dense potting mix suffocates roots within weeks. Always use coarse orchid bark or a specific orchid growing medium.
- Watering on a fixed schedule instead of checking the roots. Temperature, light level, and season all affect drying time. Root color is more accurate than any calendar.
- Cutting the flower spike at the base while it’s still green. A green spike can still produce new branches and a second flush of flowers from a node. Only remove it at the base once it has fully browned and dried.
- Keeping the plant in the same warm room all year with no temperature variation. Without the fall cool-down period, a Phalaenopsis will not produce a new spike. Stable warm conditions produce leaves, not flowers.
- Letting water sit in the crown of the plant. Crown rot is fast, and once the central growth point turns mushy, it’s almost always fatal. Tilt the plant after every watering to empty any water that has pooled between the leaves.
FAQ
What does mastering orchid care actually involve for a beginner?
Mastering orchid care comes down to four key things: providing the right amount of bright indirect light, watering by checking root color instead of following a calendar, using coarse bark mix instead of standard potting soil, and giving the plant a cooler nighttime environment in fall to trigger reblooming. None of these is technically demanding. The main challenge is unlearning standard houseplant habits that don’t apply to orchids.
How often should I water a Phalaenopsis orchid?
Water when the visible roots through the clear nursery pot shift from bright green back to silvery-grey. In practice this works out to every 7 to 10 days in summer and every 10 to 14 days in winter. Always water with lukewarm water at the sink and drain completely before returning the pot to its saucer.
Why won’t my orchid rebloom?
The most common reason is the absence of a temperature differential. Phalaenopsis need nighttime temperatures of 55 to 65 degrees F (13 to 18 degrees C) for 4 to 6 consecutive weeks to trigger a new flower spike. If the plant stays at the same warm temperature year-round, it will produce healthy leaves but no flowers. A slightly cooler spot near a window in fall typically solves this.
Are orchids toxic to cats and dogs?
No. According to the ASPCA, Phalaenopsis orchids are non-toxic to cats, dogs, and horses. This makes them one of the few flowering houseplants that is genuinely safe to keep around pets without any concern.
What is a keiki on an orchid?
A keiki (pronounced kay-kee, from the Hawaiian word for “baby”) is a small plantlet that sometimes grows from a node on the orchid’s flower spike. Once the keiki has developed roots at least 2 inches (5 cm) long and a couple of its own leaves, it can be gently removed and potted up in orchid bark as a new independent plant. Keikis are one of the easiest ways to propagate a Phalaenopsis.
How long does mastering orchid care take before the plant reblooms?
Most Phalaenopsis orchids take one growing season, roughly 9 to 12 months from the end of one bloom cycle to the start of the next, when given the right conditions. The cool-down period to trigger a spike lasts 4 to 6 weeks. Once the spike appears, flowers typically open within 2 to 3 months. Mastering orchid care means learning to work with this natural timeline rather than trying to rush it.
Can I grow orchids outside?
In USDA hardiness zones 10 through 12, Phalaenopsis can live outdoors year-round in a sheltered, shaded spot. In cooler zones, moving the orchid to a shaded outdoor patio for summer (when nighttime temperatures stay above 65 degrees F or 18 degrees C) can significantly improve plant health and flower production. Bring it back inside before temperatures drop in fall.
How do I know when to repot my orchid?
Repot every 18 to 24 months, or sooner if the bark has broken down into a fine, soggy mass, if roots are circling well outside the pot, or if you can see clearly rotted roots through the clear pot walls. Spring, immediately after flowering, is the best window for repotting.
An orchid that blooms once and never again is not a difficult plant or a failed grower. It’s a plant that needed one or two specific things it didn’t receive. Mastering orchid care is largely about identifying those two things, usually light consistency and the fall temperature drop, and adjusting for them. Everything else, the watering method, the bark mix, the fertilizer timing, falls into place once those fundamentals are right. Four years in, the plant I almost threw away after its first bloom cycle is now on its seventh, and it hasn’t missed a season yet. That’s what patience and the right knowledge can do with an orchid.
Happy planting!