Most plants do not warn you before they start dying. They sit quietly on your windowsill looking slightly off, then progressively worse, until one day you pull them out of the pot and find a root ball that smells like wet rot and crumbles at the touch. That is root rot, and it is responsible for more houseplant deaths than pests, drafts, and low light combined. The frustrating part is that by the time the leaves tell you something is wrong, the damage underground has usually been building for weeks.
Root rot is not a death sentence for your plant, though. Caught early and treated correctly, many plants recover fully. The key is knowing what you are looking for and moving fast when you find it.
What Is Root Rot and Why Does It Happen
Root rot is not a single disease. It is what happens when roots stay wet long enough for oxygen to be crowded out of the soil and for fungal pathogens to take hold. The most common culprits are water mold species like Phytophthora and Pythium, along with Rhizoctonia and Fusarium fungi. These organisms live naturally in potting soil at harmless levels, but consistently saturated conditions let them multiply and attack weakened root tissue.
Roots need oxygen to function. Waterlogged soil fills the air pockets in the potting mix, starving roots of the gas exchange they depend on. Within days, roots begin to suffocate. The outer cellular layer breaks down, turning from firm and pale to soft and dark. Once that breakdown starts, the same fungal pathogens accelerate the decay rapidly. What began as a watering habit problem becomes an active infection in the root zone.
Overwatering is the most common trigger, but it is not the only one. Poor drainage from a pot without holes, overly dense potting mix that holds water too long, a pot that is significantly too large for the plant, and low-light conditions that slow water uptake all create the same outcome: chronically wet soil that sets the stage for root rot to develop.
How to Identify Root Rot: Symptoms Above and Below Ground
The tricky thing about root rot is that leaf symptoms look nearly identical to the symptoms of other problems, particularly underwatering and low light. A wilting plant with yellowing leaves could mean the soil is too dry just as easily as it could signal saturated, rotting roots. Context and a hands-on check are what separate the two.
Above-Ground Warning Signs
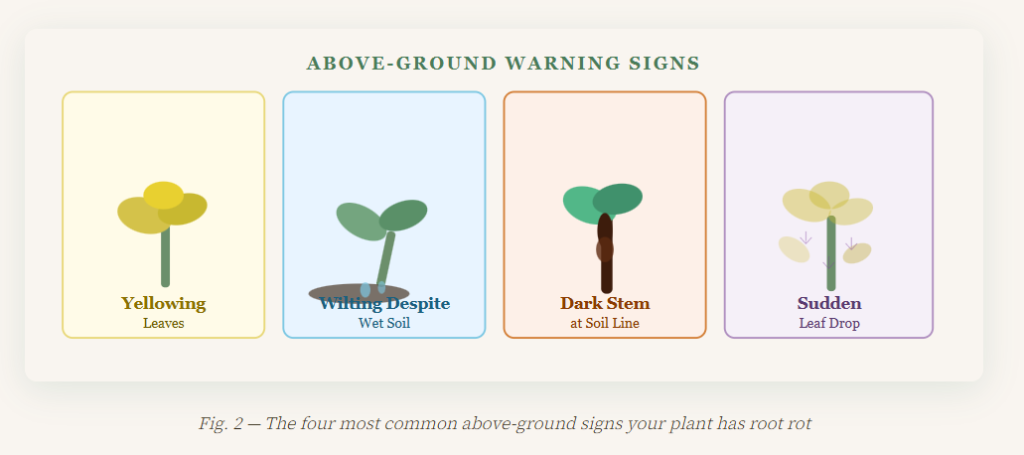
None of these symptoms confirm root rot on their own, but together they paint a clear picture. Leaves begin to yellow, often starting with the lower or older leaves. The plant wilts despite the soil being visibly moist or even wet. New growth is small, pale, or distorted. The plant feels loose in the pot, as though it has lost its anchor. Older leaves drop unexpectedly. Stem bases may look dark or soft at the soil line.
Worth noting: the combination of a wilting plant and wet soil is the most reliable above-ground indicator. A healthy plant with wet soil does not wilt. If it is, the roots are likely no longer able to transport water effectively, which points strongly to root rot damage.
Below-Ground Confirmation: How to Check the Roots
If the above-ground signs point toward root rot, the only way to confirm it is to unpot the plant and look at the roots directly. This is a five-minute process, and it gives you definitive information you cannot get any other way.
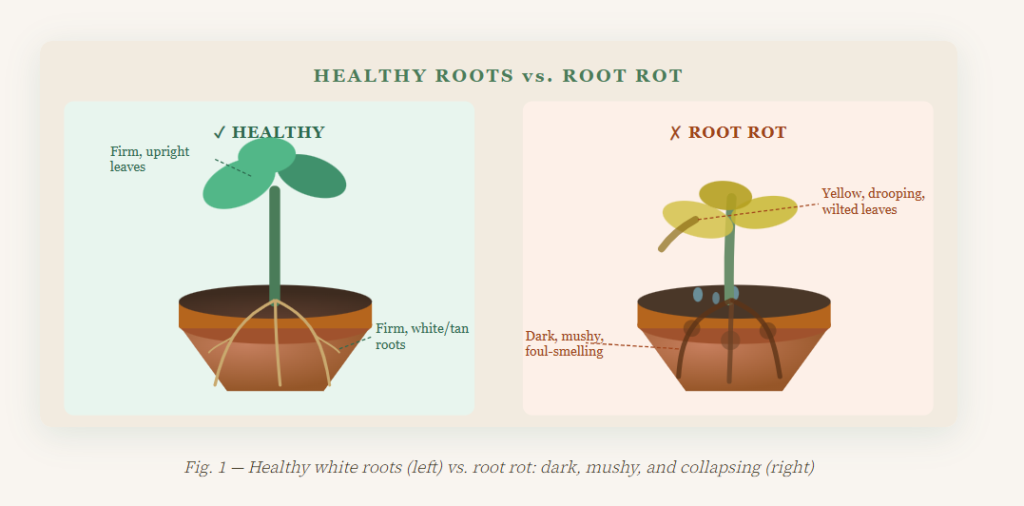
Gently tip the plant out of its pot. If the root ball falls apart in your hands or has no structural integrity, that is a strong sign. Healthy roots are white to light tan, firm, and slightly pliable. You can bend them without them snapping or slipping through your fingers. Root rot is characterized by roots that are brown to black, soft, hollow-feeling when pinched, and may have a distinctly unpleasant smell, like decay or sulfur. In advanced cases, the outer sheath of the root slides off, leaving a thin, thread-like inner strand behind.
Pro tip: You do not always have to fully repot to check. Try the “tug test” first: hold the base of the plant’s stem and gently pull upward. Healthy root systems resist and hold the plant firmly in the pot. If the plant slides out easily or the stem separates from the root ball, the roots have likely broken down significantly.
How to Treat Root Rot: Step-by-Step
Treating root rot successfully requires removing the damaged tissue, disinfecting what remains, and giving the plant a clean environment to regrow in. Moving fast matters because each day of delay allows the rot to advance further up the root system toward the crown of the plant.
Here is the full process in detail:
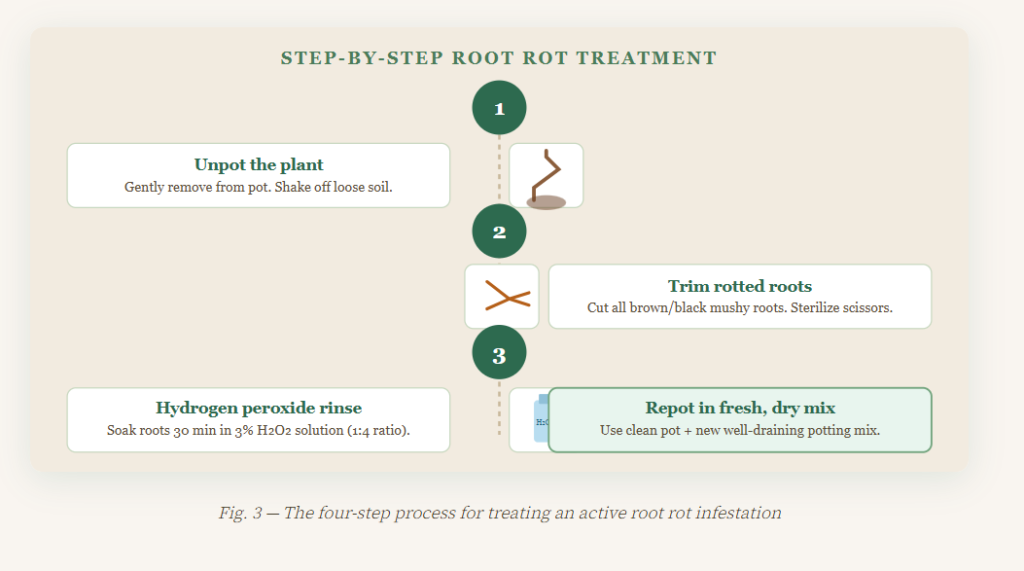
- Unpot the plant and expose the roots. Tip the pot sideways and slide the root ball out. If it sticks, run a butter knife around the inside edge of the pot first. Shake off as much loose potting mix as you can and rinse the roots gently under lukewarm water to get a clear view.
- Assess how much root rot is present. Healthy roots are white or tan and firm. Everything dark brown to black, soft, hollow, or foul-smelling needs to go. Note roughly what percentage of the root system is affected. Less than 50% affected is generally a good prognosis. More than 50% means the plant is in serious condition but may still recover with careful treatment.
- Sterilize your cutting tool. Wipe scissors or pruning shears with rubbing alcohol before you start cutting. This prevents you from transferring fungal spores from rotted material to healthy tissue.
- Cut all rotted roots cleanly. Trim back to where the root turns white and firm again. If a root is mushy all the way to where it meets the crown of the plant, remove the entire root. Do not leave any soft brown tissue behind. It will continue to rot and spread.
- Treat the remaining roots with hydrogen peroxide. Mix 3% hydrogen peroxide with water at a 1:4 ratio and either soak the trimmed root ball in it for 30 minutes or apply it directly as a rinse. This kills residual fungal spores clinging to the surviving roots. It fizzes on contact with organic matter, which is normal. Allow the roots to air dry for 15 to 20 minutes before repotting.
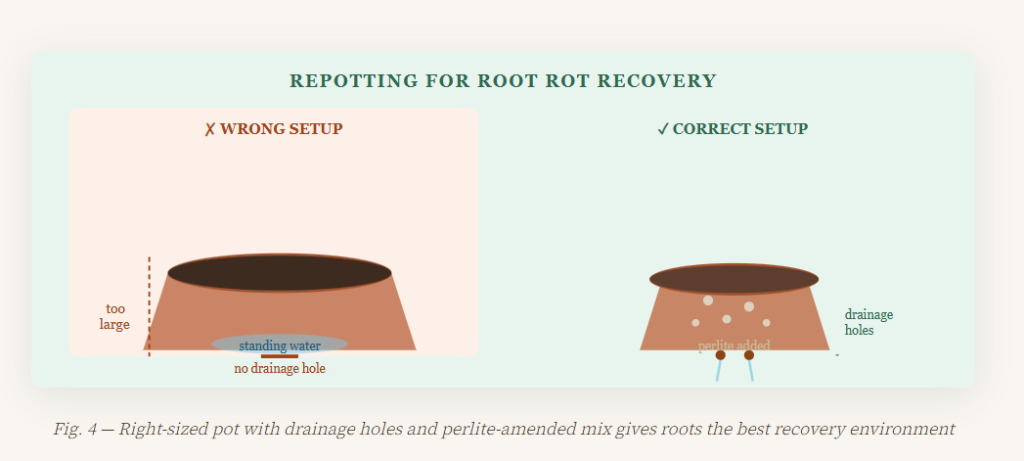
- Repot into a clean pot with fresh potting mix. Do not reuse the old potting mix. It harbors the same fungal organisms that caused the rot. Use a pot that has drainage holes and is appropriately sized: no more than 1 to 2 inches (2.5 to 5 cm) larger than the root ball. A pot that is too large holds excess moisture the plant cannot use. Mix in 20 to 30% perlite for drainage.
- Trim the foliage to match the root loss. The plant now has a reduced root system and a smaller capacity to deliver water and nutrients to leaves. Cutting back roughly the same proportion of foliage as roots removed gives the plant a better chance of stabilizing without the aboveground parts demanding more than the roots can supply.
Important: After repotting, water the plant lightly just once to settle the soil, then wait. Do not water again until the top 2 inches (5 cm) of the potting mix are fully dry. A plant recovering from root rot needs air in the soil far more than moisture.
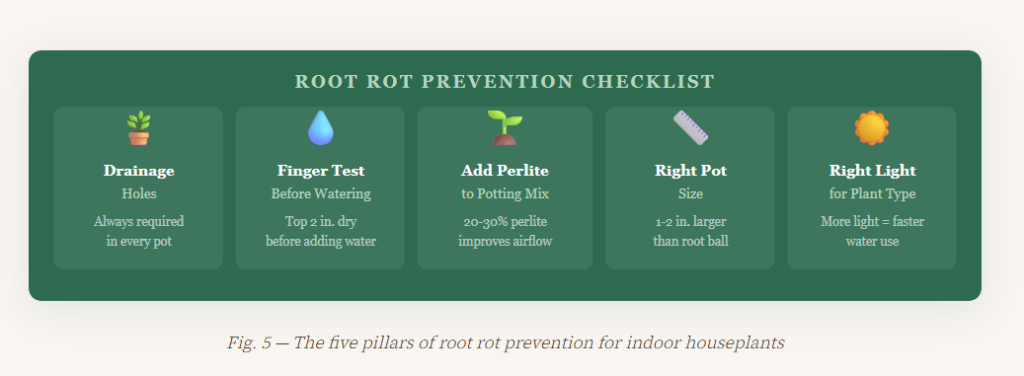
Root Rot Prevention: Keeping It From Coming Back
After treating root rot, the last thing you want is to be back in the same situation two months later. Prevention is straightforward once you understand that nearly all root rot cases trace back to the same chain of events: too much water, too little drainage, or both.
The single most important habit is letting soil dry appropriately between waterings. For most tropical houseplants, this means waiting until the top 2 inches (5 cm) are dry before watering again. For succulents and cacti, let the soil dry fully. For moisture-lovers like ferns, the surface can be slightly moist but never wet and never soggy. The finger test, pressing two fingers an inch into the soil and checking for moisture, takes three seconds and is the most reliable watering guide you have.
Pot selection matters more than most beginners realize. Always use pots with drainage holes. No pot liner inside a decorative cachepot that traps water at the bottom. If your decorative pot has no drainage, place your plant in a nursery pot inside it and check regularly that water has not pooled in the gap between them.
Soil mix composition is the third pillar of root rot prevention. Standard potting mixes sold at stores like Lowe’s and Home Depot retain water well, which is useful in outdoor conditions but leads to problems indoors where airflow is limited and evaporation is slow. Adding 20 to 30% perlite to any standard potting mix improves drainage meaningfully. For succulents, cacti, and snake plants, a 50/50 mix of potting soil and perlite or coarse sand is appropriate.
5 Mistakes That Let Root Rot Happen (and How to Fix Them)
Watering on a fixed schedule instead of checking the soil
Watering every Sunday regardless of what the plant or season requires is one of the most common paths to root rot. Plants use far less water in winter when growth slows, in low-light rooms, or when temperatures drop. The same schedule that works in July will overwater most plants by November.Fix: Always check before you water. If the top 2 inches (5 cm) are still moist, wait two more days and check again.
Using pots without drainage holes
A pot without drainage holes traps every drop of water you add. No matter how careful you are with watering volume, excess moisture has nowhere to go. Roots sit in it. Root rot follows.Fix: Always use pots with drainage. If you love the look of a decorative pot, use it as a cachepot and keep the plant in a plastic nursery pot inside it. Empty the outer container after watering.
Potting into soil that is too dense or water-retentive
Some potting mixes, particularly cheaper generic brands, compact over time and hold water in a way that prevents the air exchange roots need. This is especially true for mixes with high peat or coir content and little grit or perlite.Fix: Mix 20-30% perlite into any standard potting soil before use. For succulents and cacti, use a specialist cactus mix or a 50/50 blend of potting soil and perlite.
Using a pot that is too large for the plant
Oversized pots hold a large volume of moist soil that plant roots cannot reach quickly. That wet, unused soil around the edges of the root ball stays saturated for weeks, creating perfect root rot conditions even when you are not overwatering.Fix: Size up by 1 to 2 inches (2.5 to 5 cm) at most when repotting. Snug is better than spacious for most houseplants.
Ignoring early signs and hoping it improves
Root rot progresses. A mild case caught early is a 30-minute treatment job. A severe case left another month may mean losing the entire root system and crown. Many root rot cases are treatable. Few are fixable once they reach the stem.Fix: When a plant starts looking off and the soil is consistently wet, unpot and check the roots. Do not wait. The information you get is worth the five minutes it takes.
Related: fungus gnats in houseplants
Frequently Asked Questions About Root Rot
Can a plant recover from root rot?
Yes, many plants recover from root rot when treatment happens early enough. If at least 30 to 50% of the root system is still healthy and firm, and the rot has not reached the crown or stem, the plant has a good chance with proper treatment. Smaller, younger plants tend to be more vulnerable. Larger, established plants with extensive root systems have more reserve capacity to recover.
How do you identify root rot without unpotting the plant?
A few above-ground signs strongly suggest root rot: wilting despite wet soil, yellowing leaves that do not improve with more water, sudden unexplained leaf drop, and a soft or darkened stem base at soil level. The smell test is also useful: if you notice a sour, sulfurous, or decay-like odor when you water, root rot is a likely cause. That said, the only true confirmation is unpotting and checking the roots directly.
Should I repot a plant with root rot into dry or wet soil?
Repot into dry potting mix. Fresh, dry mix allows air to reach the recovering roots immediately after treatment. Water lightly once to settle the soil, then wait until the top 2 inches dry before watering again. Giving a recently repotted root rot patient wet soil from the start reintroduces the conditions that caused the problem in the first place.
What does root rot smell like?
Root rot has a distinctive unpleasant smell, often described as sour, sulfurous, or like decay. Healthy soil and roots do not smell foul. If watering your plant releases a bad odor from the soil, that is a reliable early signal that something is decomposing underground. The smell intensifies in advanced cases and is one of the clearest informal indicators even before you unpot the plant.
Can root rot spread from one plant to another?
Root rot fungi like Phytophthora and Pythium can spread through shared tools, contaminated soil, and water runoff. Use sterilized cutting tools when treating any plant. Do not reuse old potting mix from an affected pot. Keep affected plants isolated during treatment. Wash your hands between handling a rotted plant and touching healthy ones.
Is hydrogen peroxide safe for treating root rot?
Yes, at the correct dilution. A mix of one part 3% hydrogen peroxide to four parts water is safe for both the surviving roots and the surrounding soil. It fizzes on contact with organic matter, which kills fungal spores without leaving harmful residues. It breaks down into water and oxygen within hours. Avoid using higher concentrations or undiluted hydrogen peroxide, which can damage root tissue.
How long does it take for a plant to recover from root rot?
Recovery time depends on how severe the root rot was and how much of the root system survived. Plants with mild root rot and significant healthy root mass remaining can show new growth within 4 to 6 weeks after treatment. Severely affected plants may take 2 to 3 months to stabilize and begin growing again. During recovery, avoid fertilizing, repotting again, or moving the plant to different light conditions.
Which indoor plants are most prone to root rot?
Plants with naturally fast-draining soil requirements are most vulnerable when grown in standard potting mixes: succulents, cacti, snake plants, ZZ plants, and pothos all develop root rot quickly if kept in wet soil. Tropical plants like peace lilies and ferns prefer moist conditions, which can create confusion, but even moisture-loving plants need soil that does not stay soggy. Providing the right soil mix for each plant type is the most reliable prevention.
Related: spider mites on indoor plants
The Bottom Line on Root Rot
Root rot is one of the most common problems in indoor plant keeping, and it is almost entirely preventable with one habit change: water only when the soil actually needs it. Let the top layer dry, check before you pour, and make sure your pots have somewhere for excess water to go.
When root rot does happen, catching it early and treating it properly gives most plants a real chance at recovery. Remove the damaged roots, treat with hydrogen peroxide, repot into fresh well-draining mix, and resist the urge to overwater while the plant rebuilds its root system. The plant will do the work from there.
Your roots are out of sight, but they should never be out of mind. Happy planting.